Prepare Oracle and Oracle RAC for RDI
Prepare Oracle and Oracle RAC databases to work with RDI
Oracle provides two main systems that Debezium can use to capture data changes:
The sections below explain how to configure each system for use with Debezium and RDI.
LogMiner
Follow the steps below to configure LogMiner and prepare your database for use with RDI.
1. Configure Oracle LogMiner
The following example shows the configuration for Oracle LogMiner.
sysdba. See the
separate example below to configure Amazon RDS for Oracle.ORACLE_SID=ORACLCDB dbz_oracle sqlplus /nolog
CONNECT sys/top_secret AS SYSDBA
alter system set db_recovery_file_dest_size = 10G;
alter system set db_recovery_file_dest = '/opt/oracle/oradata/recovery_area' scope=spfile;
shutdown immediate
startup mount
alter database archivelog;
alter database open;
-- You should now see "Database log mode: Archive Mode"
archive log list
exit;
Configure Amazon RDS for Oracle
AWS provides its own set of commands to configure LogMiner.
Check that Oracle has backups enabled with the following command:
SQL> SELECT LOG_MODE FROM V$DATABASE;

LOG_MODE
------------
ARCHIVELOG
The LOG_MODE should be set to ARCHIVELOG. If it isn't then you
should reboot your Oracle AWS RDS instance.
Once LOG_MODE is correctly set to ARCHIVELOG, execute the following
commands to complete the LogMiner configuration. The first command enables
archive logging and the second adds supplemental logging.
exec rdsadmin.rdsadmin_util.set_configuration('archivelog retention hours',24);
exec rdsadmin.rdsadmin_util.alter_supplemental_logging('ADD');
2. Enable supplemental logging
You must enable supplemental logging for the tables you want to capture or for the entire database. This lets Debezium capture the state of database rows before and after changes occur.
The following example shows how to configure supplemental logging for all columns
in a single table called inventory.customers:
ALTER TABLE inventory.customers ADD SUPPLEMENTAL LOG DATA (ALL) COLUMNS;
You must also enable minimal supplemental logging at the database level with the following command:
ALTER DATABASE ADD SUPPLEMENTAL LOG DATA;
3. Check the redo log sizing
Before you use the Debezium connector, you should check with your database administrator that there are enough redo logs with enough capacity to store the data dictionary for your database. In general, the size of the data dictionary increases with the number of tables and columns in the database. If you don't have enough capacity in the logs then you might see performance problems with both the database and the Debezium connector.
4. Set the Archive log destination
You can configure up to 31 different destinations for archive logs
(you must have administrator privileges to do this). You can set parameters for
each destination to specify its purpose, such as log shipping for physical
standbys, or external storage to allow for extended log retention. Oracle reports
details about archive log destinations in the V$ARCHIVE_DEST_STATUS view.
The Debezium Oracle connector only uses destinations that have a status of
VALID and a type of LOCAL. If you only have one destination with these
settings then Debezium will use it automatically.
If you have more than one destination with these settings,
then you should consult your database administrator about which one to
choose for Debezium.
Use the log.mining.archive.destination.name property in the connector configuration
to select the archive log destination for Debezium.
For example, suppose you have two archive destinations, LOG_ARCHIVE_DEST_2 and
LOG_ARCHIVE_DEST_3, and they both have status set to VALID and type set to
LOCAL. Debezium could use either of these destinations, so you must select one
of them explicitly in the configuration. To select LOG_ARCHIVE_DEST_3, you would
use the following setting:
{
    "log.mining.archive.destination.name": "LOG_ARCHIVE_DEST_3"
}
5. Create a user for the connector
The Debezium Oracle connector must run as an Oracle LogMiner user with specific permissions.
Typically, when you create the Oracle account for the connector, you grant the account a level of access that permits the connector to detect changes from all tables in the database. However, in some environments, security policies might prohibit you from granting such a broad level of access.
The following example shows some SQL that creates an Oracle user account for the connector in a multi-tenant database model. The grant settings in the example permit the Debezium user to access all user tables in the database.
To comply with security policies, you can modify the SELECT ANY TABLE and FLASHBACK ANY TABLE grants
so that the connector can access only those tables that you intend to capture.
Do not modify other grants, such as the SELECT ANY TRANSACTION grant,
or the set of SELECT ON V_$ grants, which provide access to dynamic performance views (V_$).
These grants are required for the connector to function.
sqlplus sys/top_secret@//localhost:1521/ORCLCDB as sysdba
CREATE TABLESPACE logminer_tbs DATAFILE '/opt/oracle/oradata/ORCLCDB/logminer_tbs.dbf'
    SIZE 25M REUSE AUTOEXTEND ON MAXSIZE UNLIMITED;
exit;

sqlplus sys/top_secret@//localhost:1521/ORCLPDB1 as sysdba
CREATE TABLESPACE logminer_tbs DATAFILE '/opt/oracle/oradata/ORCLCDB/ORCLPDB1/logminer_tbs.dbf'
    SIZE 25M REUSE AUTOEXTEND ON MAXSIZE UNLIMITED;
exit;

sqlplus sys/top_secret@//localhost:1521/ORCLCDB as sysdba

CREATE USER c##dbzuser IDENTIFIED BY dbz
    DEFAULT TABLESPACE logminer_tbs
    QUOTA UNLIMITED ON logminer_tbs
    CONTAINER=ALL;

GRANT CREATE SESSION TO c##dbzuser CONTAINER=ALL;
GRANT SET CONTAINER TO c##dbzuser CONTAINER=ALL;
GRANT SELECT ON V_$DATABASE to c##dbzuser CONTAINER=ALL;

-- See `Limiting privileges` below if the privileges
-- granted by these two commands raise security concerns.
GRANT FLASHBACK ANY TABLE TO c##dbzuser CONTAINER=ALL;
GRANT SELECT ANY TABLE TO c##dbzuser CONTAINER=ALL;
--

GRANT SELECT_CATALOG_ROLE TO c##dbzuser CONTAINER=ALL;
GRANT EXECUTE_CATALOG_ROLE TO c##dbzuser CONTAINER=ALL;
GRANT SELECT ANY TRANSACTION TO c##dbzuser CONTAINER=ALL;
GRANT LOGMINING TO c##dbzuser CONTAINER=ALL;

-- See `Limiting privileges` below if the privileges
-- granted by these two commands raise security concerns.
GRANT CREATE TABLE TO c##dbzuser CONTAINER=ALL;
GRANT LOCK ANY TABLE TO c##dbzuser CONTAINER=ALL;
--

GRANT CREATE SEQUENCE TO c##dbzuser CONTAINER=ALL;

GRANT EXECUTE ON DBMS_LOGMNR TO c##dbzuser CONTAINER=ALL;
GRANT EXECUTE ON DBMS_LOGMNR_D TO c##dbzuser CONTAINER=ALL;

GRANT SELECT ON V_$LOG TO c##dbzuser CONTAINER=ALL;
GRANT SELECT ON V_$LOG_HISTORY TO c##dbzuser CONTAINER=ALL;
GRANT SELECT ON V_$LOGMNR_LOGS TO c##dbzuser CONTAINER=ALL;
GRANT SELECT ON V_$LOGMNR_CONTENTS TO c##dbzuser CONTAINER=ALL;
GRANT SELECT ON V_$LOGMNR_PARAMETERS TO c##dbzuser CONTAINER=ALL;
GRANT SELECT ON V_$LOGFILE TO c##dbzuser CONTAINER=ALL;
GRANT SELECT ON V_$ARCHIVED_LOG TO c##dbzuser CONTAINER=ALL;
GRANT SELECT ON V_$ARCHIVE_DEST_STATUS TO c##dbzuser CONTAINER=ALL;
GRANT SELECT ON V_$TRANSACTION TO c##dbzuser CONTAINER=ALL;

GRANT SELECT ON V_$MYSTAT TO c##dbzuser CONTAINER=ALL;
GRANT SELECT ON V_$STATNAME TO c##dbzuser CONTAINER=ALL;

exit;
| Role name | Description |
|---|---|
| CREATE SESSION | Enables the connector to connect to Oracle. |
| SET CONTAINER | Enables the connector to switch between pluggable databases. This is only required when the Oracle installation has container database support (CDB) enabled. |
| SELECT ON V_$DATABASE | Enables the connector to read the V_$DATABASE table. |
| FLASHBACK ANY TABLE | Enables the connector to perform Flashback queries, which is how the connector performs the initial snapshot of data. Optionally, rather than granting FLASHBACK permission on all tables, you can grant the FLASHBACK privilege for specific tables only. |
| SELECT ANY TABLE | Enables the connector to read any table. Optionally, rather than granting SELECT permission on all tables, you can grant the SELECT privilege for specific tables only. |
| SELECT_CATALOG_ROLE | Enables the connector to read the data dictionary, which is needed by Oracle LogMiner sessions. |
| EXECUTE_CATALOG_ROLE | Enables the connector to write the data dictionary into the Oracle redo logs, which is needed to track schema changes. |
| SELECT ANY TRANSACTION | Enables the snapshot process to perform a Flashback snapshot query against any transaction so that the connector can read past changes from LogMiner. When FLASHBACK ANY TABLE is granted, this should also be granted. This grant is optional for Oracle 19c and later. In those later releases, the connector obtains the required privileges through the EXECUTE_CATALOG_ROLE and LOGMINING grants. |
| LOGMINING | This role was added in newer versions of Oracle as a way to grant full access to Oracle LogMiner and its packages. On older versions of Oracle that don’t have this role, you can ignore this grant. |
| CREATE TABLE | Enables the connector to create its flush table in its default tablespace. The flush table allows the connector to explicitly control flushing of the LGWR internal buffers to disk. |
| LOCK ANY TABLE | Enables the connector to lock tables during schema snapshot. If snapshot locks are explicitly disabled via configuration, this grant can be safely ignored. |
| CREATE SEQUENCE | Enables the connector to create a sequence in its default tablespace. |
| EXECUTE ON DBMS_LOGMNR | Enables the connector to run methods in the DBMS_LOGMNR package. This is required to interact with Oracle LogMiner. On newer versions of Oracle this is granted via the LOGMINING role but on older versions, this must be explicitly granted. |
| EXECUTE ON DBMS_LOGMNR_D | Enables the connector to run methods in the DBMS_LOGMNR_D package. This is required to interact with Oracle LogMiner. On newer versions of Oracle this is granted via the LOGMINING role but on older versions, this must be explicitly granted. |
| SELECT ON V_$…. | Enables the connector to read these tables. The connector must be able to read information about the Oracle redo and archive logs, and the current transaction state, to prepare the Oracle LogMiner session. Without these grants, the connector cannot operate. |
Limiting privileges
The privileges granted in the example above are convenient, but you may prefer to restrict them further to improve security. In particular, you might want to prevent the Debezium user from creating tables, or selecting or locking any table.
The Debezium user needs the CREATE TABLE privilege to create the
LOG_MINING_FLUSH table when it connects for the first
time. After this point, it doesn't need to create any more tables,
so you can safely revoke this privilege with the following command:
REVOKE CREATE TABLE FROM c##dbzuser container=all;
The example above grants the SELECT ANY TABLE and
FLASHBACK ANY TABLE privileges for convenience, but only the tables synced to RDI
and the V_$XXX tables strictly need these privileges.
You can replace the GRANT SELECT ANY TABLE command with explicit
commands for each table. For example, you would use commands like the
following for the tables in our sample
chinook
database. (Note that Oracle 19c requires you to run a separate GRANT
command for each table individually.)
GRANT SELECT ON chinook.album TO c##dbzuser;
GRANT SELECT ON chinook.artist TO c##dbzuser;
GRANT SELECT ON chinook.customer TO c##dbzuser;
...
Similarly, instead of GRANT FLASHBACK ANY TABLE, you would use the following
commands:
GRANT FLASHBACK ON chinook.album TO c##dbzuser;
GRANT FLASHBACK ON chinook.artist TO c##dbzuser;
GRANT FLASHBACK ON chinook.customer TO c##dbzuser;
...
The LOCK privilege is automatically granted by the SELECT
privilege, so you can omit this command if you have granted SELECT
on specific tables.
Revoking existing privileges
If you initially set the Debezium user's privileges on all tables, but you now want to restrict them, you can revoke the existing privileges before resetting them as described in the Limiting privileges section.
Use the following commands to revoke and reset the SELECT privileges:
REVOKE SELECT ANY TABLE FROM c##dbzuser container=all;
ALTER SESSION SET container=orclpdb1;

GRANT SELECT ON chinook.album TO c##dbzuser;
-- ...etc
The equivalent commands for FLASHBACK are:
REVOKE FLASHBACK ANY TABLE FROM c##dbzuser container=all;
ALTER SESSION SET container=orclpdb1;
GRANT FLASHBACK ON chinook.album TO c##dbzuser;
The SELECT privilege automatically includes the LOCK
privilege, so when you grant SELECT for specific tables
you should also revoke LOCK on all tables:
REVOKE LOCK ANY TABLE FROM c##dbzuser container=all;
6. Configuration is complete
Once you have followed the steps above, your Oracle database is ready for Debezium to use.
Xstream
Xstream is a set of database components and APIs to communicate change data to and from an Oracle database. RDI specifically uses Xstream Out to capture changes.
Follow the steps in the sections below to configure Xstream to work with Debezium and RDI.
oracle user.1. Configure Xstream
Create a directory for the recovery area:
mkdir /opt/oracle/oradata/recovery_area
Then, use the following SQL commands to configure Xstream (using the
chinook
schema as an example):
sqlplus sys/<PASSWORD> as sysdba

SQL> alter system set db_recovery_file_dest_size = 5G;
SQL> alter system set db_recovery_file_dest = '/opt/oracle/oradata/recovery_area' scope=spfile;
SQL> alter system set enable_goldengate_replication=true;
SQL> shutdown immediate
Database closed.
Database dismounted.
ORACLE instance shut down.
SQL> startup mount
ORACLE instance started.

Total System Global Area 1476391776 bytes
Fixed Size     9134944 bytes
Variable Size 1006632960 bytes
Database Buffers   452984832 bytes
Redo Buffers     7639040 bytes
Database mounted.
SQL> alter database archivelog;
SQL> alter database open;
SQL> archive log list
Database log mode       Archive Mode
Automatic archival       Enabled
Archive destination       USE_DB_RECOVERY_FILE_DEST
Oldest online log sequence     10
Next log sequence to archive   12
Current log sequence       12

SQL> ALTER DATABASE ADD SUPPLEMENTAL LOG DATA;

SQL> alter session set container=orclpdb1;

SQL> ALTER TABLE CHINOOK.ALBUM ADD SUPPLEMENTAL LOG DATA (ALL) COLUMNS;
SQL> ALTER TABLE CHINOOK.ARTIST ADD SUPPLEMENTAL LOG DATA (ALL) COLUMNS;
SQL> ALTER TABLE CHINOOK.CUSTOMER ADD SUPPLEMENTAL LOG DATA (ALL) COLUMNS;
SQL> ALTER TABLE CHINOOK.EMPLOYEE ADD SUPPLEMENTAL LOG DATA (ALL) COLUMNS;
SQL> ALTER TABLE CHINOOK.GENRE ADD SUPPLEMENTAL LOG DATA (ALL) COLUMNS;
SQL> ALTER TABLE CHINOOK.INVOICE ADD SUPPLEMENTAL LOG DATA (ALL) COLUMNS;
SQL> ALTER TABLE CHINOOK.INVOICELINE ADD SUPPLEMENTAL LOG DATA (ALL) COLUMNS;
SQL> ALTER TABLE CHINOOK.MEDIATYPE ADD SUPPLEMENTAL LOG DATA (ALL) COLUMNS;
SQL> ALTER TABLE CHINOOK.PLAYLIST ADD SUPPLEMENTAL LOG DATA (ALL) COLUMNS;
SQL> ALTER TABLE CHINOOK.PLAYLISTTRACK ADD SUPPLEMENTAL LOG DATA (ALL) COLUMNS;
SQL> ALTER TABLE CHINOOK.TRACK ADD SUPPLEMENTAL LOG DATA (ALL) COLUMNS;
2. Create Xstream users
Create an Xstream administrator user with the following SQL:
sqlplus sys/<PASSWORD> as sysdba

SQL> CREATE TABLESPACE xstream_adm_tbs DATAFILE '/opt/oracle/oradata/ORCLCDB/xstream_adm_tbs.dbf'
    SIZE 25M REUSE AUTOEXTEND ON MAXSIZE UNLIMITED;

SQL> alter session set container=orclpdb1;

SQL> CREATE TABLESPACE xstream_adm_tbs DATAFILE '/opt/oracle/oradata/ORCLCDB/ORCLPDB1/xstream_adm_tbs.dbf'
    SIZE 25M REUSE AUTOEXTEND ON MAXSIZE UNLIMITED;

SQL> alter session set container=cdb$root;

SQL> CREATE USER c##dbzadmin IDENTIFIED BY dbz
    DEFAULT TABLESPACE xstream_adm_tbs
    QUOTA UNLIMITED ON xstream_adm_tbs
    CONTAINER=ALL;

SQL> GRANT CREATE SESSION, SET CONTAINER TO c##dbzadmin CONTAINER=ALL;

SQL> BEGIN
     DBMS_XSTREAM_AUTH.GRANT_ADMIN_PRIVILEGE(
        grantee                 => 'c##dbzadmin',
        privilege_type          => 'CAPTURE',
        grant_select_privileges => TRUE,
        container               => 'ALL'
     );
  END;
  /
Then, create the Xstream user:
sqlplus sys/<PASSWORD> as sysdba

SQL> CREATE TABLESPACE xstream_tbs DATAFILE '/opt/oracle/oradata/ORCLCDB/xstream_tbs.dbf'
    SIZE 25M REUSE AUTOEXTEND ON MAXSIZE UNLIMITED;

SQL> alter session set container=orclpdb1;

SQL> CREATE TABLESPACE xstream_tbs DATAFILE '/opt/oracle/oradata/ORCLCDB/ORCLPDB1/xstream_tbs.dbf'
    SIZE 25M REUSE AUTOEXTEND ON MAXSIZE UNLIMITED;

SQL> alter session set container=cdb$root;

SQL> CREATE USER c##dbzxsuser IDENTIFIED BY dbz
    DEFAULT TABLESPACE xstream_tbs
    QUOTA UNLIMITED ON xstream_tbs
    CONTAINER=ALL;

SQL> GRANT CREATE SESSION TO c##dbzxsuser CONTAINER=ALL;
SQL> GRANT SET CONTAINER TO c##dbzxsuser CONTAINER=ALL;
SQL> GRANT SELECT ON V_$DATABASE to c##dbzxsuser CONTAINER=ALL;
SQL> GRANT FLASHBACK ANY TABLE TO c##dbzxsuser CONTAINER=ALL;
SQL> GRANT SELECT_CATALOG_ROLE TO c##dbzxsuser CONTAINER=ALL;
SQL> GRANT EXECUTE_CATALOG_ROLE TO c##dbzxsuser CONTAINER=ALL;
SQL> GRANT SELECT ANY TABLE TO c##dbzxsuser CONTAINER=ALL;
SQL> GRANT LOCK ANY TABLE TO c##dbzxsuser CONTAINER=ALL;
If you are using the Debezium Xstream documentation, you should note that it misses out the last two GRANT statements shown above:
GRANT SELECT ANY TABLE TO c##dbzxsuser CONTAINER=ALL;
GRANT LOCK ANY TABLE TO c##dbzxsuser CONTAINER=ALL;
However, without these, no tables can be read by Debezium, so neither the initial snapshot nor any subsequent updates will produce any data.
3. Create an Xstream outbound server
Create the outbound server with the following SQL. Note that
you must connect as the c##dbzadmin user created in the previous step,
not the sys user:
sqlplus c##dbzadmin/dbz@localhost:1521/ORCLCDB

SQL> DECLARE
  tables  DBMS_UTILITY.UNCL_ARRAY;
  schemas DBMS_UTILITY.UNCL_ARRAY;
BEGIN
    tables(1)  := NULL;
    schemas(1) := 'chinook';
  DBMS_XSTREAM_ADM.CREATE_OUTBOUND(
    server_name           =>  'dbzxout',
    source_container_name =>  'orclpdb1',
    table_names           =>  tables,
    schema_names          =>  schemas);
END;
/
The value NULL for tables enables data capture from all tables in the chinook
schema, unless the changes have been made by the sys or system users.
The Debezium documentation is misleading here. It includes the line
schemas(1) := 'debezium';
instead of
schemas(1) := 'chinook';
as shown above. However, this will only capture data from a schema named debezium. Also,
you must provide the source_container_name parameter if you are capturing changes from
a pluggable database.
Then, configure the XStream user account to connect to the XStream outbound server:
sqlplus sys/<PASSWORD> as sysdba

BEGIN
  DBMS_XSTREAM_ADM.ALTER_OUTBOUND(
    server_name  => 'dbzxout',
    connect_user => 'c##dbzxsuser');
END;
/
4. Add a custom Docker image for the Debezium server
To support XStream connector, you must create a custom Docker image that includes the required Instant Client package libraries for Linux x64 from the Oracle website.
-
On the Docker machine, download the Instant Client package for Linux x64 from the Oracle website
wget https://download.oracle.com/otn_software/linux/instantclient/2380000/instantclient-basic-linux.x64-23.8.0.25.04.zip -
Unzip it to the
./dbz-oradirectory:unzip instantclient-basic-linux.x64-23.8.0.25.04.zip -d ./dbz-ora -
Create a
Dockerfilein the./dbz-oradirectory with the following contents:FROM debezium/server:3.0.8.Final USER root RUN microdnf -y install libaio \ && microdnf clean all \ && mkdir -p /opt/oracle/instant_client \ && rm -f /debezium/lib/ojdbc11*.jar COPY instantclient_23_8/* /opt/oracle/instant_client USER jboss COPY instantclient_23_8/xstreams.jar /debezium/lib COPY instantclient_23_8/ojdbc11.jar /debezium/lib ENV LD_LIBRARY_PATH=/opt/oracle/instant_client -
Create the custom image:
docker build -t dbz-ora dbz-ora -
Add the image to the K3s image registry using the following commands:
docker tag dbz-ora quay.io/debezium/server:3.0.8.Final
docker image save quay.io/debezium/server:3.0.8.Final -o dbz3.0.8-xstream-linux-amd.tar
sudo k3s ctr images import dbz3.0.8-xstream-linux-amd.tar all
5. Enable the Oracle configuration in RDI
Finally, you must update your config.yaml file to enable Xstream.
The example below shows the relevant parts of the sources section:
sources:
  oracle:
    type: cdc
    logging:
      level: info
    connection:
      type: oracle
      host: host.docker.internal
      port: 1521
      user: ${SOURCE_DB_USERNAME}
      password: ${SOURCE_DB_PASSWORD}
    advanced:
      source:
        database.dbname: ORCLCDB
        database.pdb.name: ORCLPDB1
        database.connection.adapter: xstream
        database.out.server.name: dbzxout
See the
Debezium Oracle documentation
for a full list of properties you can use in the advanced.source subsection.
6. Configuration is complete
After you have followed the steps above, your Oracle database is ready for Debezium to use.
Support for Oracle XMLTYPE columns (optional)
If your Oracle database contains tables with columns of type
XMLTYPE,
you must configure additional libraries for Debezium Server to process these columns correctly.
Create a custom Debezium Server image
To support XMLTYPE columns, you must create a custom Docker image
that includes the required Oracle XML libraries.
-
Download the required libraries from Maven Central:
mkdir xml cd xml wget https://repo.maven.apache.org/maven2/com/oracle/database/xml/xdb/19.27.0.0/xdb-19.27.0.0.jar wget https://repo.maven.apache.org/maven2/com/oracle/database/xml/xmlparserv2/19.27.0.0/xmlparserv2-19.27.0.0.jar mv xdb-19.27.0.0.jar xdb.jar mv xmlparserv2-19.27.0.0.jar xmlparserv2.jar -
Create a
Dockerfilein the same directory:FROM quay.io/debezium/server:3.0.8.Final USER root COPY xdb.jar /debezium/lib COPY xmlparserv2.jar /debezium/lib -
Build the custom image:
cd .. docker build -t dbz-xml xml docker tag dbz-xml quay.io/debezium/server:3.0.8.Final docker image save quay.io/debezium/server:3.0.8.Final -o dbz3.0.8-xml-linux-amd.tar -
Add the image to your K3s image repository:
sudo k3s ctr images import dbz3.0.8-xml-linux-amd.tar all
Configure RDI for XMLTYPE support
In your RDI configuration file, set the lob.enabled property to true in the
advanced.source section:
sources:
  oracle:
    type: cdc
    logging:
      level: info
    connection:
      type: oracle
      host: oracle
      port: 1521
      user: ${SOURCE_DB_USERNAME}
      password: ${SOURCE_DB_PASSWORD}
      database: ORCLCDB
    advanced:
      source:
        database.pdb.name: ORCLPDB1
        lob.enabled: true
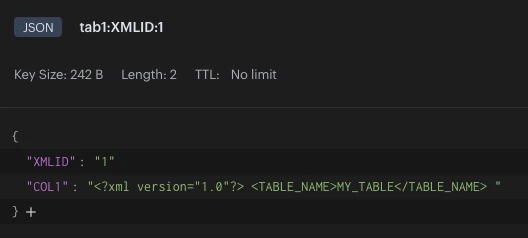
Test XMLTYPE support
You can create a test table to verify that XMLTYPE columns work correctly
(using the
CHINOOK
schema as an example):
CREATE TABLE tab1 (
  xmlid INT NOT NULL,
  col1  SYS.XMLTYPE,
  CONSTRAINT PK_tab1 PRIMARY KEY (xmlid)
);

DECLARE
  v_xml   SYS.XMLTYPE;
  v_doc   CLOB;
BEGIN
  -- XMLTYPE created from a CLOB
  v_doc := '<?xml version="1.0"?>' || Chr(10) || ' <TABLE_NAME>MY_TABLE</TABLE_NAME>';
  v_xml := SYS.XMLTYPE.createXML(v_doc);

  INSERT INTO tab1 (xmlid, col1) VALUES (1, v_xml);

  -- XMLTYPE created from a query
  SELECT SYS_XMLGEN(table_name)
  INTO   v_xml
  FROM   user_tables
  WHERE  rownum = 1;

  INSERT INTO tab1 (xmlid, col1) VALUES (2, v_xml);

  COMMIT;
END;
/

ALTER TABLE CHINOOK.TAB1 ADD SUPPLEMENTAL LOG DATA (ALL) COLUMNS;
After you run an initial snapshot, the XML data appears in your Redis target database: